So today I started implementing a small prototype for our search index microservice, which I should implement as a .NET Core console application. The datasource of this index process is a MS-SQL database. I decided to connect to it via the library EntityFrameworkCore. As I am expected to work with an existing database, I will also choose to implement this using a database first approach. After the initial setup I realized, that this was not as easy as it was with the .Net Standard EntityFramework Library, so I will share my learnings with you in this small post.
Create a new .Net Core Console Application
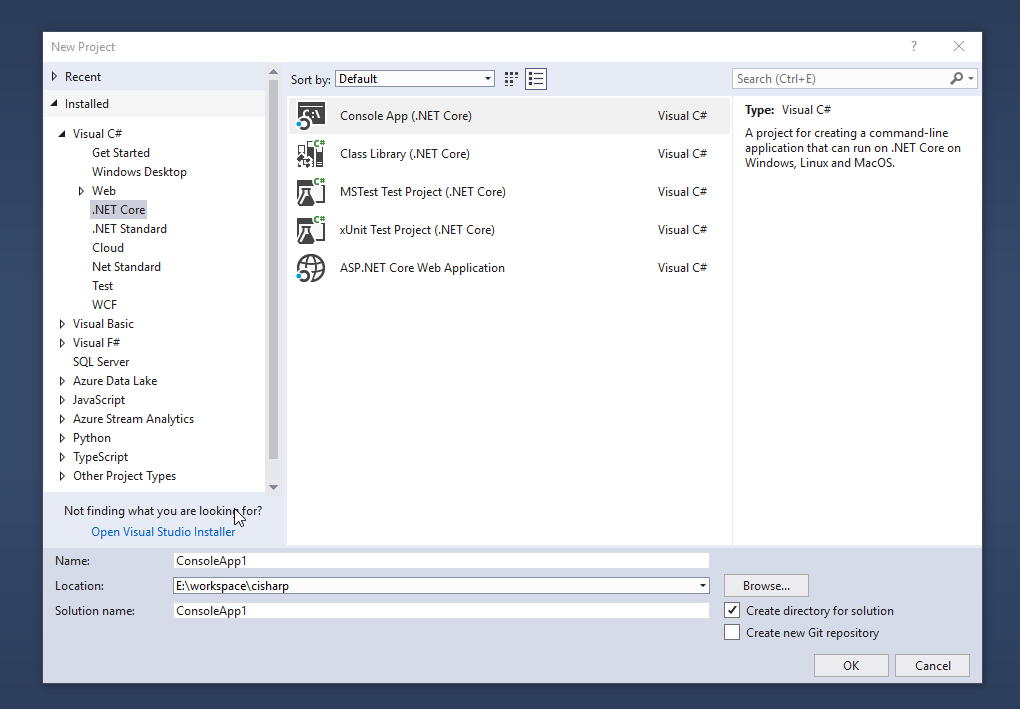
To start off, create a new .NET Core Console Application. I used Visual Studio 2017 15.8.7 for this tutorial.
Click File – New Project and choose “Console App” under the category “Visual C# – .NET Core”. Give it a name and choose the location where you want to save your source files and click on OK to create the empty console project. A hello world example console application will be created for you.
Add required nuget packages
After creation, add the following nuget packages to your project. Either by using the package manager console or the GUI (right click on the project – “Manage NuGet packages…”.
- Microsoft.EntityFrameworkCore
- Microsoft.EntityFrameworkCore.SqlServer
- Microsoft.EntityFrameworkCore.SqlServer.Design
- Microsoft.EntityFrameworkCore.Tools
Here is a small snippet you can use to install those packages with your package manager console:
|
1 2 3 4 |
Install-Package Microsoft.EntityFrameworkCore Install-Package Microsoft.EntityFrameworkCore.SqlServer Install-Package Microsoft.EntityFrameworkCore.SqlServer.Design Install-Package Microsoft.EntityFrameworkCore.Tools |
Create model from database – Database-First approach
As this is a database first approach, I will show you how to create your model classes from an existing database. I’ve used one of the Adventure Works sample databases from microsoft for this task. I’ve restored one of the .bak files into a local SQLExpress instance running on my local development machine.
After restoring your sample database (you may skip this step and just use your development database) we can start to generate our model classes. I recommend to create a folder in your project that should contain all model classes, I have named it “Data”:

After that, open your package manager console once again and execute the following command to create your model classes:
|
1 2 |
cd ConsoleApp1 dotnet ef dbcontext scaffold "Server=MYPC\SQLEXPRESS;Database=AdventureWorks2016;Trusted_Connection=True;" Microsoft.EntityFrameworkCore.SqlServer --output-dir Data |
After running this command, your model classes and database context class should be created in the data directory. Please refer to the documentation of dotnet ef dbcontext scaffold for further command line options.

If the following error occurs, build your project before running the model creation:
Your startup project ‘ConsoleApp1’ doesn’t reference Microsoft.EntityFrameworkCore.Design. This package is required for the Entity Framework Core Tools to work. Ensure your startup project is correct, install the package, and try again.
Add configuration string to appsettings.json
In my case I was required to manage the configuration string to the database with the appsettings.json file. Add a new appsettings.json file and enter your connection string to it, it should look like this:
|
1 2 3 4 5 |
{ "ConnectionStrings": { "AdventureWorks2016": "Server=MYPC\\SQLEXPRESS;Database=AdventureWorks2016;Trusted_Connection=True;" } } |
Don’t forget to change the Copy to output directory setting of the appsettings.json file to “Copy if newer”.
To read this configuration file, add the following nuget packages to your project:
- Microsoft.Extensions.Configuration
- Microsoft.Extensions.Configuration.FileExtensions
- Microsoft.Extensions.Configuration.Json
Or paste the following commands into your packages manager console. Don’t forget to build your project after completion of the commands.
|
1 2 3 |
Install-Package Microsoft.Extensions.Configuration Install-Package Microsoft.Extensions.Configuration.FileExtensions Install-Package Microsoft.Extensions.Configuration.Json |
Add the following using to your Program.cs file:
|
1 |
using Microsoft.Extensions.Configuration; |
Then you can read your connection string using the following snippet.
|
1 2 3 4 |
IConfiguration config = new ConfigurationBuilder() .AddJsonFile("appsettings.json", true, true) .Build(); string connectionString = config.GetConnectionString("AdventureWorks2016"); |
Work with your created database context
Before we can create a new database context instance we need a way to pass the connection string to the context constructor. To achieve this, I’ve decided to implement add a partial class for the database context and add the constructor which initializes the context with a connection string parameter. See the following code snippet as an example:
|
1 2 3 4 5 6 7 8 9 10 11 12 13 14 15 16 |
using Microsoft.EntityFrameworkCore; namespace ConsoleApp1.Data { public partial class AdventureWorks2016Context { public AdventureWorks2016Context(string connectionString) : this(GetOptions(connectionString)) { } private static DbContextOptions<AdventureWorks2016Context> GetOptions(string connectionString) { return SqlServerDbContextOptionsExtensions.UseSqlServer(new DbContextOptionsBuilder<AdventureWorks2016Context>(), connectionString).Options; } } } |
Now you can initialize a database context with your connection string from the appsettings.json file:
|
1 2 3 4 5 6 7 8 9 10 11 12 13 14 15 16 17 18 |
using ConsoleApp1.Data; using Microsoft.Extensions.Configuration; namespace ConsoleApp1 { class Program { static void Main(string[] args) { // Get connection string IConfiguration config = new ConfigurationBuilder().AddJsonFile("appsettings.json", true, true).Build(); string connectionString = config.GetConnectionString("AdventureWorks2016"); // Connect to database var databaseContext = new AdventureWorks2016Context(connectionString); } } } |
After creating the new database context instance, you may begin to implement your queries. I’ve used linq to showcase a small example query to the AdventureWorks database:
|
1 2 |
IList<Person> personsWithTitles = databaseContext.Person .Where(person => person.Title != null).ToList(); |
Conclusion
This blog post should give you a good starting point for a microservice connecting to a MS-SQL database using a database-first approach. You can download the full solution here: Example project EF Core
Please also consider to visit our new company homepage Jack Project, we would be happy to help you to increase your W.A.P.D. perfomance!