In the last post about IBM WebSphere MQ, I described how to install the current developer edition (v9.05) on your local Windows 10 Environment. In this blog post I will show, how to code a simple .NET C# Client to send and receive messages over the created message queue. This tutorial is based on the given code samples from IBM you get after installing the developer edition of the IBM Websphere MQ Server. In my installation they were located at “E:\Programme\ibmmq\Tools\dotnet\samples\cs\base”.
Creating the new project
I used Visual Studio 2017, Community Edition, to code this sample.
You can download the full sample solution at: https://github.com/Kingviech/mq-cisharp-sample
To start, create a new C# Console Project start with file new project and choose the “Console-App (.NET Framework)” project template and name it “MqTest”.

After hitting the OK-Button your project is created and the Program.cs file is opened for you.
Adding references to the MQ-Libraries
Next up we will add the necessary references for the example application. To start this, right click on the references in the solution explorer of your created example project and click on the “Add reference…” menu entry.
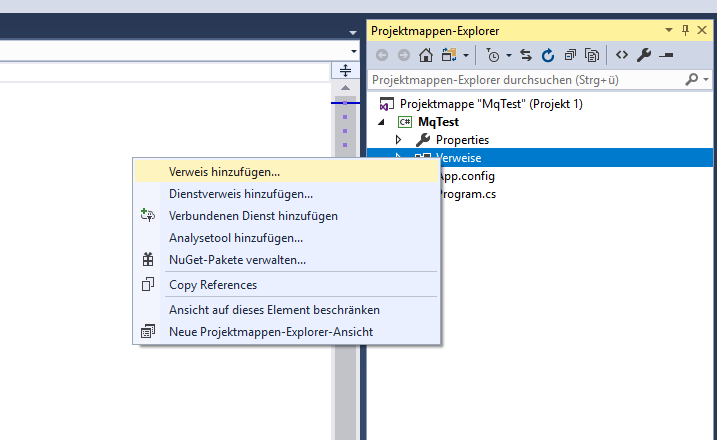
Next click on the section “Explore” to search in the file explorer for the DLL needed for implementing the MQ-Client.

The DLL needed for this project is located inside the installation folder of your local IBM Websphere MQ installation, in my case it was located at the following file path: E:\Programme\ibmmq\Tools\Lib\amqmdnet.dll
After successfully adding the reference, it appears in the list of project references in the solution explorer.
Connecting to the Queue Manager
In the last part of this tutorial we created the queue manager QMA which we will connect to in this part of the tutorial.
Before starting out, add the following usings at the top of your Program.cs file:
|
1 2 3 4 5 6 7 8 9 10 11 12 13 |
using System; using IBM.WMQ; namespace MqTest { class Program { static void Main(string[] args) { // TODO } } } |
After that we create an instance of Type MQQueueManager with the queue manager name as a constructor parameter:
|
1 2 3 4 5 6 7 8 9 10 11 12 13 14 |
static void Main(string[] args) { MQQueueManager mqQMgr; // Try to create a mqqueue manager instance try { mqQMgr = new MQQueueManager("QMA"); } catch (MQException mqe) { // TODO Error handling on connection error } } |
Connecting to the queue
After successfully connecting to the queue manager we are ready to connect to the simple local queue we created in the last part of the tutorial which was named “QMA1”. We can create a connection to this queue in a similar way as we created the queue manager. We create an instance of type MQQueue and pass the queue name as constructor parameter. Additionally, we add flags to the second constructor parameter to tell the MQQueue instance, that allow to read the output of the queue and allows us to create messages in the queue. Additionally, the flat “MQOO_INQUIRE” was added, to be able to read attributes from the queue object itself.
|
1 2 3 4 5 6 7 8 9 10 11 12 13 14 15 |
static void Main(string[] args) { ////// Connection to the queue manager omitted // Open the queue MQQueue mqQueue; try { mqQueue = mqQMgr.AccessQueue("QMA1", MQC.MQOO_OUTPUT | MQC.MQOO_INPUT_SHARED | MQC.MQOO_INQUIRE); } catch (MQException mqe) { // TODO Error handling if connection to the queue failed } } |
Sending a simple “Hello, World!” to your queue
For sending a simple text message to the queue, we must prepare an instance of the MQMessage class and put it on the queue. The following code snippet shows how to do this.
|
1 2 3 4 5 6 7 8 9 10 11 12 13 14 15 16 17 18 19 20 |
static void Main(string[] args) { //// Initialization of queue manager and queue omitted // Prepare hello world message var mqMsg = new MQMessage(); mqMsg.WriteString("Hello from the example client!"); mqMsg.Format = MQC.MQFMT_STRING; var mqPutMsgOpts = new MQPutMessageOptions(); // Place the message on the queue, using default put message options try { mqQueue.Put(mqMsg, mqPutMsgOpts); } catch (MQException mqe) { // TODO Error handling for message put failed } } |
After executing our code, we can look at the messages of our queue and we can see the sent message from our client (you can look at the messages of the queue in your IBM MQ Explorer installation, as described in the last part of this tutorial)!

Receiving messages from the queue
For receiving a message, the GET method of the queue object can be used. This method requires a target message object to write any received message to and message options for defining parameters like wait timeout. In the following code a simple get method is executed (you may want to execute this code in a loop, to keep receiving new messages from your queue).
|
1 2 3 4 5 6 7 8 9 10 11 12 13 14 15 16 17 18 19 20 21 22 23 24 25 26 27 28 29 30 31 32 33 34 35 |
static void Main(string[] args) { // Initialization of queue manager and queue omitted // Get message mqMsg = new MQMessage(); var mqGetMsgOpts = new MQGetMessageOptions { WaitInterval = 15 * 1000 }; // 15 second limit for waiting mqGetMsgOpts.Options |= MQC.MQGMO_WAIT; try { mqQueue.Get(mqMsg, mqGetMsgOpts); Console.WriteLine(string.Compare(mqMsg.Format, MQC.MQFMT_STRING, StringComparison.Ordinal) == 0 ? mqMsg.ReadString(mqMsg.MessageLength) : "Non-text message"); } catch (MQException mqe) { // report reason, if any if (mqe.Reason == MQC.MQRC_NO_MSG_AVAILABLE) { // special report for normal end Console.WriteLine("Wait timeout happened"); } else { // general report for other reasons Console.WriteLine("MQQueue::Get ended with " + mqe); // treat truncated message as a failure for this sample if (mqe.Reason == MQC.MQRC_TRUNCATED_MSG_FAILED) { // TODO Handle connection error here } } } } |
When we run this program now, we receive the message sent previously by our program.

Cleaning up
After all your receiving is done, you may want to close the connections to the queue and disconnect from the queue manager. This is done by calling the corresponding methods of the MQQueue and MQQueueManager instances.
|
1 2 3 4 5 6 7 8 9 10 11 12 13 14 15 16 17 |
static void Main(string[] args) { //// Connection, sending and receiving part omitted try { //Close the Queue mqQueue.Close(); //Close the Queue Manager mqQMgr.Disconnect(); } catch (MQException mqe) { // TODO Error handling for error while disconnecting from the queue manager and queue } } |
Conclusion
In this series I have shown how to connect to a local developer edition of IBM Websphere MQ. The last part, connecting to a remote MQ-Server, will be available after I have implemented the customer request in the next 2 months, stay tuned!
I hope this was helpful to anyone, any feedback is greatly appreciated!
Loving these posts. Quick typo to fix in the very first paragraph. You say “IBM WebSphere” when you mean “IBM WebSphere MQ”. Feel free to delete this comment once you have made the correction. Cheers!
Thanks for your feedback! I’ve already corrected the post.
Hoping to come up with the next part as soon as the project continues 🙂
Hi!
any updates on this?? Thank you
Hi Mark,
this article is great! i found it extremely helpful, is it possible to have the part with the connection to a remote MQ-Server?
Thank you so much
Hello Cristian.
I haven’t had the chance to try this out as the project I was working on switched to another messaging technology.
If I have the time in the next weeks to try this out, I will be back with another article.
Thanks for your feedback!
Excellent post.
Can .NET server and MQ server be in different Hosts ?
Do we have to install MQ client on .net server ?
Can we connect to a Qmgr without giving Qmgr name ?
Thanks in Advance